Step 1: Draw and trace off Contact Poses.
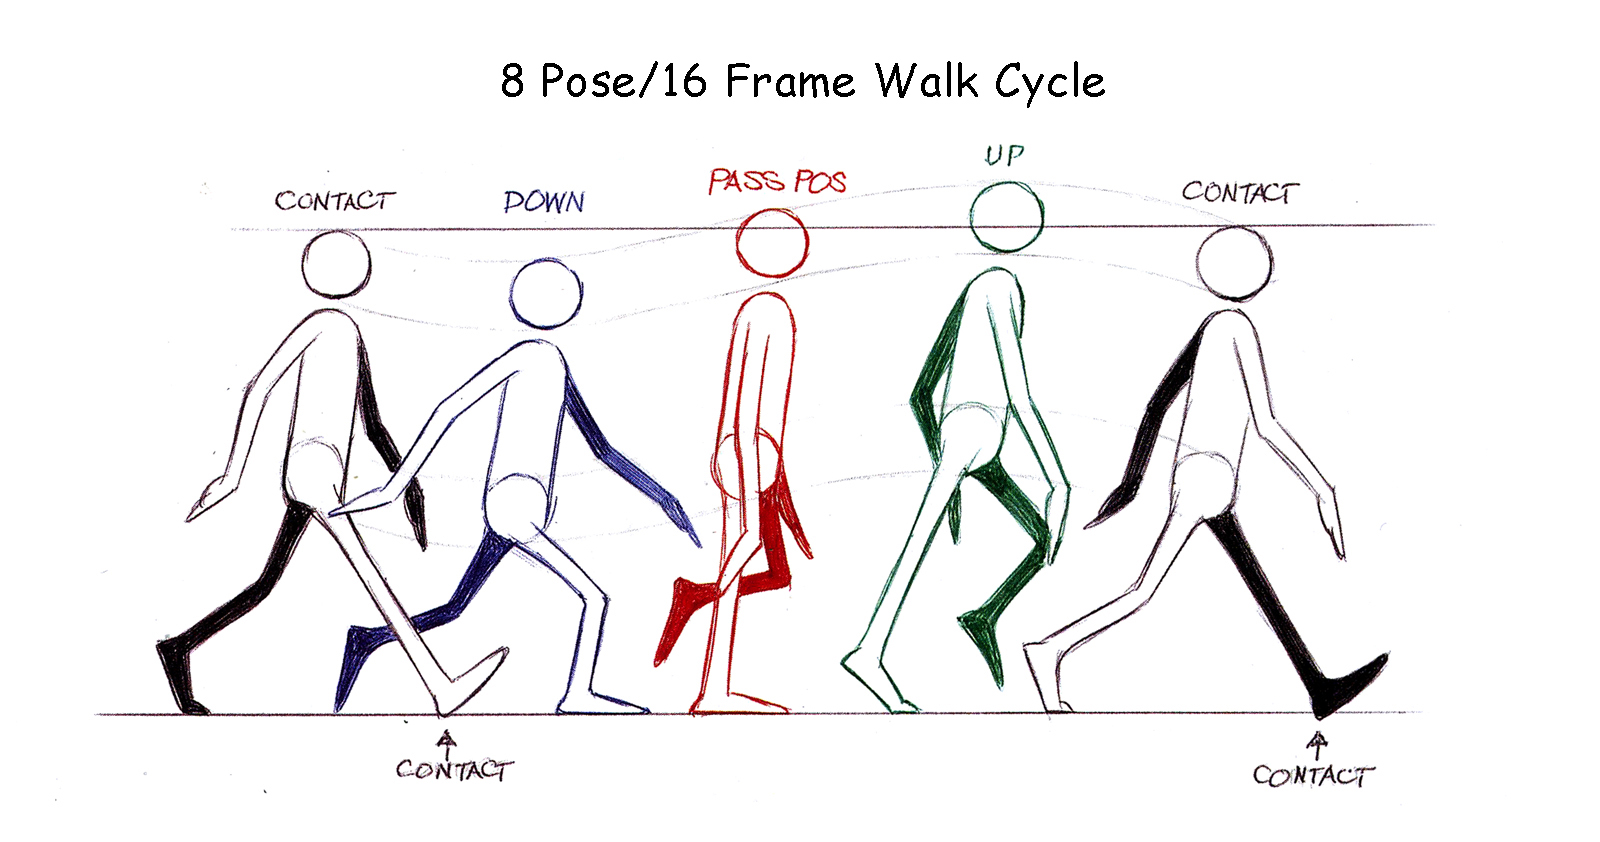
Contact pose (C-1): Heel to Toe contact sets the attitude of the walk.
Contact pose (C-5): Trace C-1 and reverse the arms and legs.
Step 2: Passing Pose (P-3): Start with the planted foot. Be sure to straighten the leg which in turn raises the torso and head.
Step 3: Down Pose (D-2): Draw the Down Pose between C-1 and P-3. Always start with the planted foot, bend the leg and make sure the head drops.
Step 4: Up Pose (U-4): Draw the Up Pose between P-3 and C-5. Push up with the ball of the foot which raises the head. Extent the far knee forward.
Test Shoot Walk Cycle: Shoot on 1's in Dragonframe and play back @ 6 fps. Only shoot Drawings C-1 through U-4 and loop the playback. Watch to make sure your arms are swinging consistently, fett are contacting the groundplane firmly and you're getting a nice head bob. If you like what you see you are ready for the next step.
- Frame up your drawings in DF and tape down pegbar.
- Shoot only the first 4 drawings on 1's. Set playback @ 6 fps.
- Set loop playback to preview animation.
- If you like what you see move on to the next step.
2. SECOND STRIDE/BLUE-LINE
Blue Line Draw-Over: Use a sharpened blue pencil to draw over each red drawing to clarify your lines (if your red lines are dark you can push back with an eraser). Use this pass to make sure your feet are contacting the ground plane and your hands and feet hold their shape. Work in the same order you drew your red pass in. Start with the two Contact poses, Passing, Down, then Up.
Trace-Off Final Poses: Use the red pencil to light trace-off and reverse the remaining three poses (D-6, P-7, and U-8). Then use your blue pencil to strengten the lines and shade the far arm and leg to distinguish which side is closest to camera. You should now have eight drawings to complete your walk cycle.
Shoot Finished Walk Cycle @ 6fps: You are now ready to shoot all 8 drawings in Dragonframe. Set playback to loop @ 6fps. Arms should pendulum nicely, feet should contact the ground and head should bob gently. If you like what you see copy all 8 frames and paste them 5 times for a total 48 frames. Export movie, name and submit to @DROPBOX.
- Set Dragonframe to 16:9 Aspect Ratio
- Frame up your drawings in DF and tape down pegbar.
- Shoot animation on 1's @ 6 fps.
- Copy/Paste cycle 5 times in the DF timeline (48 frames total).
- Export Movie at 1920 x 1080/H264 and submit to Class Folder
Naming:
simpsonb_walkCycle01.mp4